 Shadowrocket Official Manual · Tutorial
Shadowrocket Setup GuideImport Subscriptions and Test Connections
Import your existing access details, then choose how traffic should be handled. Follow these five steps to connect for the first time and verify the result with an actual request. You do not need to change every advanced setting first.
Add Server: Add a server or import with Subscribe
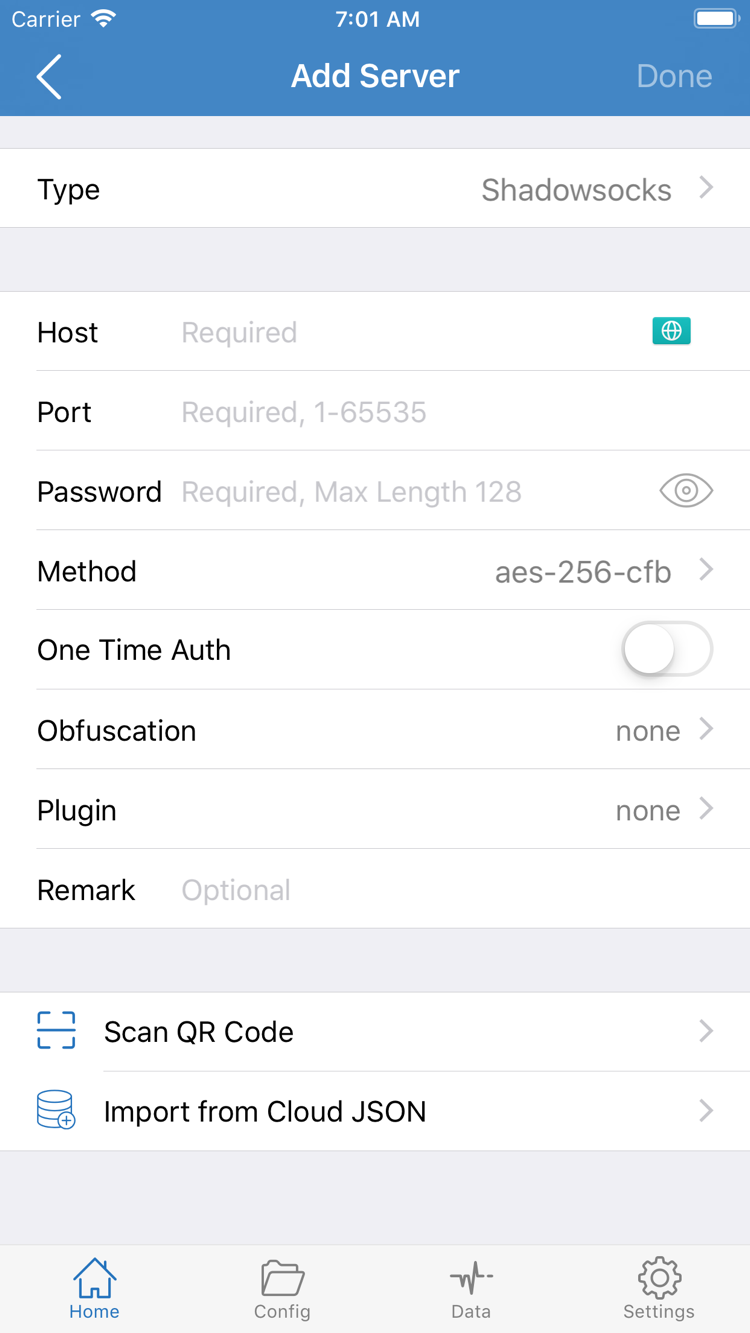
Open Shadowrocket and stay on Home. For the initial setup, leave the connection switch at the top turned off. Select Add Server, then choose the method that matches the details you have: use Subscribe for a full subscription link, or enter the fields for an individual server manually according to its protocol. Do not split a subscription URL into a server address and password, and do not enter a single server share link as a subscription URL.
If you have a subscription link
In Add Server, select Subscribe under Type, then paste the full subscription link into the URL field. Check the beginning and end of the link to make sure you have not included quotation marks, spaces, or explanatory text from a chat message; keep all query parameters unchanged. Give the subscription a recognizable name, save it, and return to Home. The entry location may vary slightly between versions; use the visible Subscribe option and URL field.
After importing, wait for the subscription to load, then check whether server entries appear in the list. If only the subscription name appears with no selectable servers beneath it, the import is not complete. First check that the link is valid and that your current network can access it. Updating a subscription fetches the list again; it does not verify that every entry can connect. For your first attempt, select one existing entry and continue with the checks below. Avoid importing multiple subscriptions at once, so you can identify which group may have a problem.
If you have details for a single server
Return to Add Server, select the correct Type, then enter the remaining details as provided. For example, after selecting Shadowsocks, check Host, Port, Password, and Method one by one. Enter a server domain or IP in Host, without adding a web path; enter a numeric port in Port. The Method must match the server configuration; do not guess based on similar names. Other protocols show different fields, which should be completed using the information from your service provider.
If you have a QR code, use Scan QR Code and grant camera access when prompted by the system. Use Import from Cloud JSON only if you have a compatible JSON configuration; it is not the same as a regular subscription link. Whichever import method you use, return to Home after saving, confirm that an entry appears in the SERVER group, and select a server. For more on share links, subscription updates, and organizing duplicate entries, continue to the Server Management Manual. You do not need to finish all organization tasks before your first connection.
Global Routing: Config, Proxy, and Direct
Once a server entry is available, return to Home and open Global Routing. This setting determines how requests are handled, not which subscription to use. The three options are Config, Proxy, and Direct. Decide whether you need rule-based routing or want to check the server connection, then choose an option. Selecting a server in the list does not mean all requests will necessarily use it.
Choose Config for everyday use
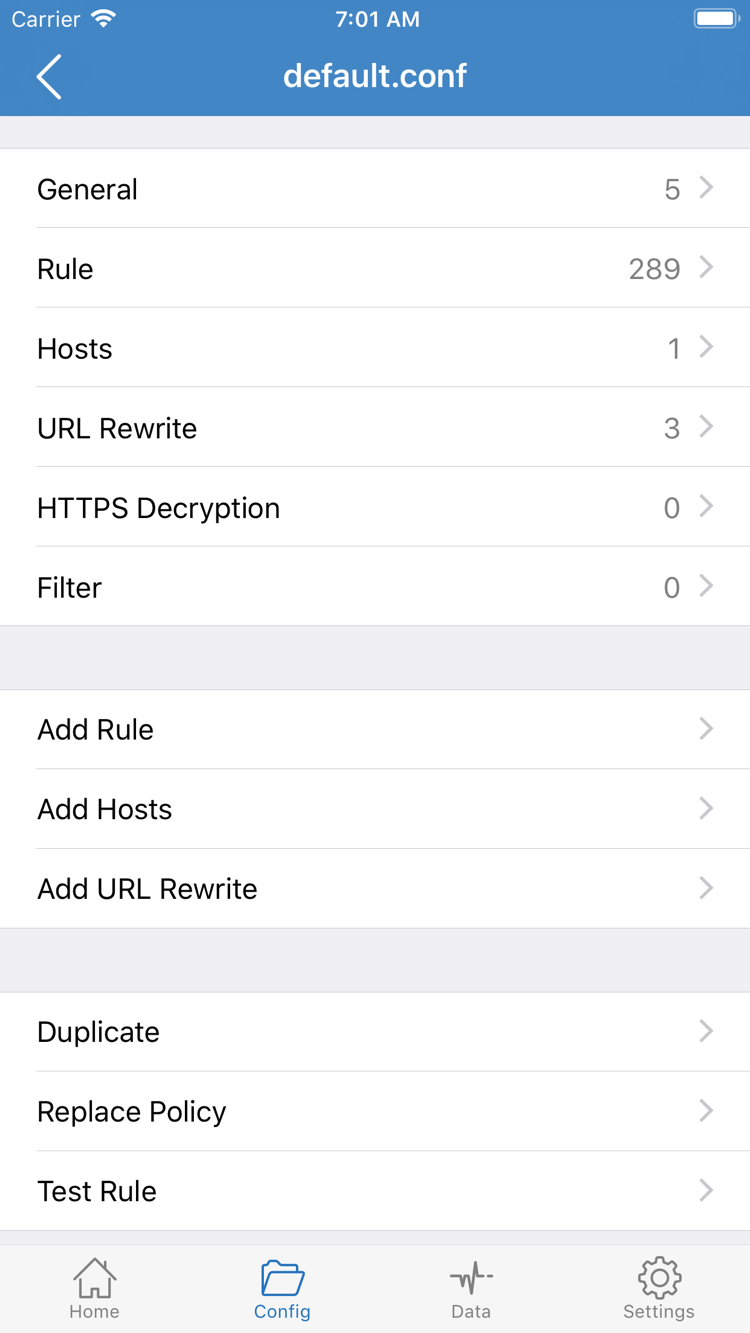
Config uses rules in the current configuration file to determine how requests are handled, making it suitable for everyday use when different requests need different policies. After selecting it, open the Config page at the bottom and confirm that the file you intend to use is enabled. The file may contain sections such as General, Rule, Hosts, URL Rewrite, and HTTPS Decryption. For the initial setup, focus on Rule. You do not need to edit every section just to connect, or enable HTTPS Decryption.
PROXY in a rule means to handle the request using a proxy policy, DIRECT means to connect directly, and REJECT means to reject the request. Rules are checked from top to bottom, so an earlier match can affect the result. A request may use DIRECT even when the connection is established; this is not necessarily an error. Add Rule in the editor adds a rule, but for now it is best to keep an existing working configuration and make changes after verifying the connection. See the Glossary for rule keyword definitions.
Use Proxy and Direct for diagnosis
Proxy handles requests through the proxy, which can temporarily reduce the effect of rule matching on the result. It still depends on a selected server, valid credentials, and an available network; it cannot fix incorrect server fields. Direct accesses the destination without a proxy and can be used as a basic network comparison. It does not switch to a proxy automatically just because a server is listed. For an initial check, verify the basic network first, test an existing server with Proxy, then return to Config to verify rule-based routing.
Home: Turn on the switch and authorize the connection
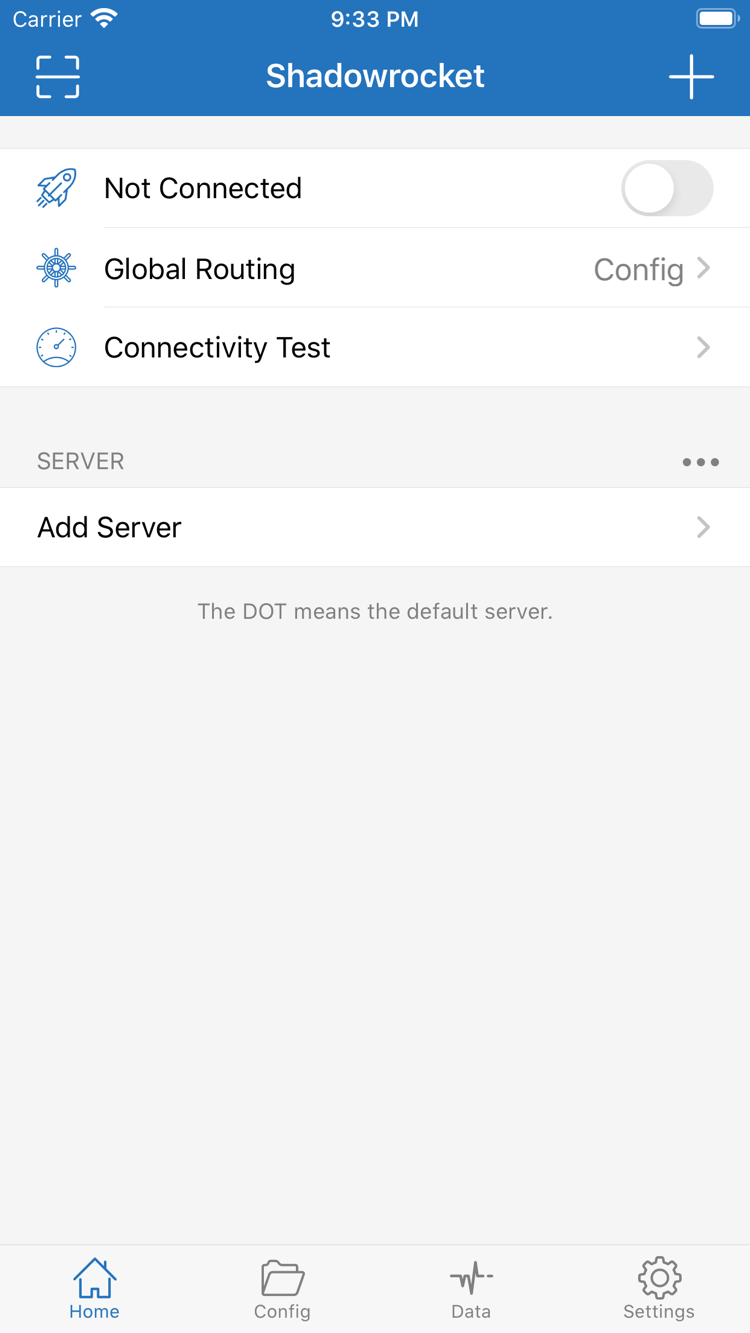
Return to Home and check two things again: the server selected under SERVER is the one you intend to test, and Global Routing shows the mode you chose. Once confirmed, turn on the switch beside Not Connected at the top of the page. The first connection may show a system prompt to add a VPN configuration. This authorization is required for the app to use the system's network connection capability. Read the prompt, then confirm or complete device verification as required by the system.
If you canceled the authorization, return to the app and try again. Do not repeatedly edit the server address to solve a permission issue. After authorizing, return to Home and wait for the status to change; avoid rapidly toggling the switch. If it immediately turns off again or the page still shows Not Connected, this stage is not complete. First check authorization, system network settings, and whether another network configuration is affecting the attempt.
Establishing the system connection and reaching the remote server are two separate things. A switch that stays on means the app has entered a connected state; it does not guarantee that the password is correct, the server is reachable, or the destination website is available. After the connection status changes, run Connectivity Test and try an actual request rather than adding more settings. Record whether the connection can be established separately from whether requests succeed once connected. This makes troubleshooting more direct.
For the initial check, keep the current Wi-Fi or mobile network unchanged, and leave the app in the foreground until the status stabilizes. If you need to switch servers, identify the newly selected entry and check the test result again. Changing the network, server, and Global Routing at the same time makes it difficult to determine the cause of success or failure. Explore On Demand later if you need automatic connections; for the initial setup, use the manual switch to establish a repeatable baseline.
Connectivity Test: Compare the test with actual access
Once the connection switch is on, tap Connectivity Test on Home. The test provides a reference for the current connection conditions; it does not replace checking the service you actually need. Wait for the test to finish, then open a browser and refresh the page you need to access. If possible, make a new request instead of checking only cached page content. If you are testing an app, retry the relevant action in that app as well.
Record three things separately: the connection status on Home, whether Connectivity Test completed, and whether the actual page worked. They do not always match. For example, if the test completes but a page fails, the cause may be the rule for the destination domain, the destination service itself, or DNS. If the test fails but the page opens, the test method or destination may not suit the current network. Do not judge an entire subscription as invalid based on one test value, and do not treat the result as a service quality ranking.
Compare modes once to narrow down the issue
If a page does not open in Config, keep the same server and destination, temporarily switch to Proxy, and try again. If Proxy works but Config does not, first check the enabled configuration file, the matching rule, and DNS settings rather than immediately replacing all server details. If Proxy also fails, check the basic network and existing server fields. Direct can help determine whether the destination is accessible without a proxy, but success with Direct does not confirm that the proxy connection works.
After confirming that the proxy connection works, switch back to your everyday Config and visit one destination expected to use PROXY and another expected to use DIRECT. You can check the request or traffic information available in Data in your current version, alongside the rules. A change in traffic volume alone is still not enough to confirm which rule matched a destination. See the Server Management Manual for full rule examples, rule order checks, and subscription management. Explore those details as needed; do not add many new rules during the initial verification.
Settings: Common failure points and retest order
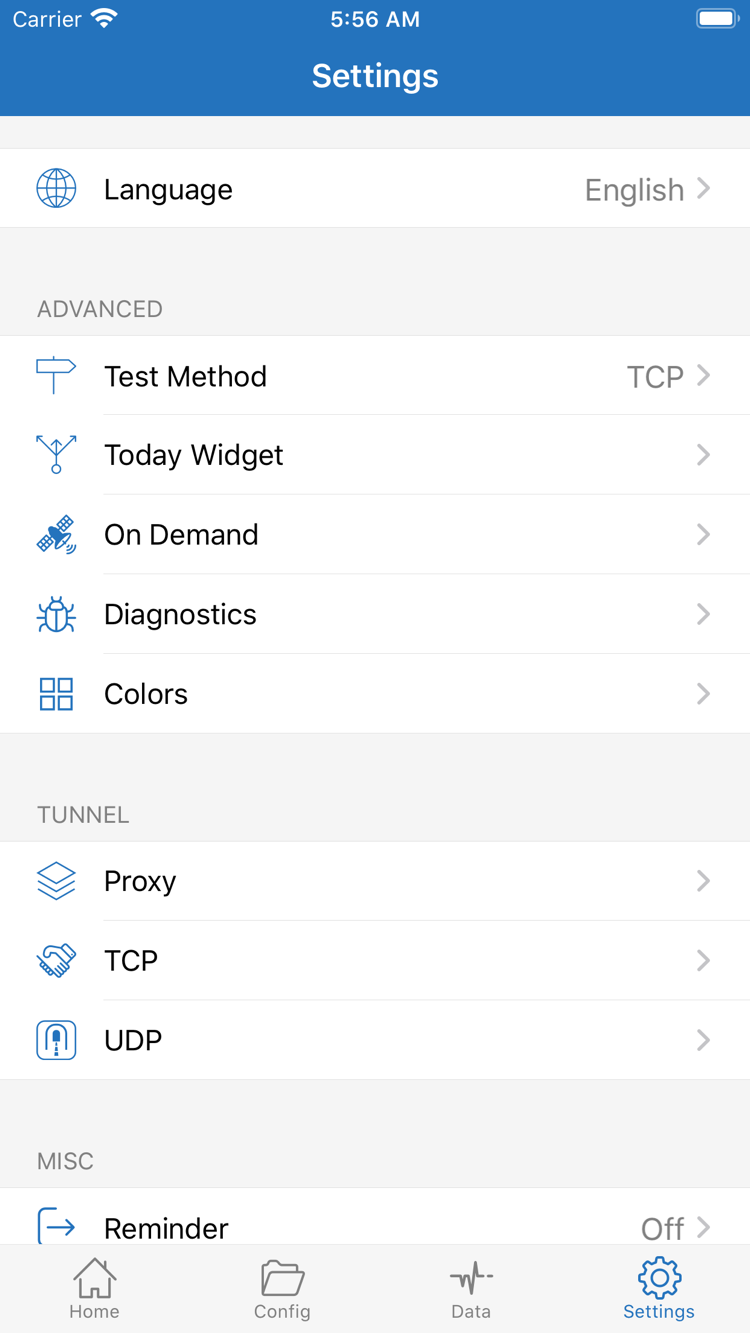
When a problem occurs, first identify the stage where it stopped, then open Settings. This page includes options such as Test Method, On Demand, Diagnostics, Proxy, TCP, and UDP, but you do not need to adjust all of them to make your first connection. Leave unrelated options unchanged and change one condition at a time. Reconnect and test again to confirm whether the change helped.
Import fails or the list is empty
If no selectable server appears, return to the subscription field and check whether the URL is complete, especially its trailing parameters, and whether copying added a line break or extra characters. Confirm that the current network can access the subscription, then try updating it. Repeatedly adding the same link usually creates duplicate groups rather than fixing an invalid address. If your service provider confirms that the link has changed or access conditions have been updated, use the latest details they provide; do not guess at characters in the address.
The switch is on, but requests fail
First confirm the selected entry, then check Type, Host, Port, and authentication details. When entering fields manually, a mismatch between the protocol type and Method or a space before or after the password can cause a connection failure. After checking the fields, compare with another server you already have on the same network. If all entries fail, check the basic network and system authorization again. Do not change several settings such as TCP and UDP at once; that introduces more variables.
Test results and page results do not match
Open Settings and check Test Method to confirm that the current test method matches your understanding of the result. Network conditions may allow one kind of test while preventing the requests needed by an actual page, or the reverse may happen. If only a few domains fail, return to Config and check the relevant rules and DNS, then compare with Proxy. For further troubleshooting, use Diagnostics to record the time, selected mode, error text, and reproducible steps, rather than keeping only a screenshot of the switch.
The connection changes automatically or has issues after switching networks
If the connection turns back on after you manually switch it off, check whether On Demand is enabled and whether the system has saved corresponding on-demand settings. For initial troubleshooting, temporarily disable any automatic connection conditions you have enabled, then connect manually as described in Step 03. If the issue occurs only after switching between Wi-Fi and mobile networks, test each network separately and record the differences. Do not attribute a brief result after a network switch to the subscription content.
When asking your service provider about an existing service, share only the necessary details of the problem. Hide access parameters in the subscription URL, Password, QR codes, and personal information. Deleting the app or clearing the entire list is not a first-line troubleshooting step and may make your existing configuration impossible to restore. Keep working files and entries before addressing problematic ones. Continue to the Server Management Manual for subscription backups, groups, and update strategies, or check unfamiliar English terms in the Glossary.
Keep the working configuration after connecting
Keep the current working subscription name, server selection, and configuration file. Use the conditions from this successful connection as a reference when you later change rules or update a subscription. Back up your configuration before adding another one, so the working setup stays separate from items still being tested.
Continue reading: Subscriptions and server management · Interface terms and rule keywords · First installation and system approval